Virtual Infrastructure is growing day by day. In any organization, a lot of new VM builds are provisioned every day. Everyone looking to reduce the VM deployment and configuration duration. To reduce the OS installation duration, We are using VMWare Templates and Clone feature to deploy the organization standard virtual machine images. Take a look at my article to understand the difference between clone and template. We use the base images with all the software and patches installed on OS as per the organization security standards and then convert it to templates to deploy the virtual machine from templates to reduce timeframe required for OS installation and software installs. Ok. I understood that We have reduced the OS and software installation timeframe. Then how to reduce the OS configuration timeframe. We need the way to automate the OS configuration to reduce the OS customization timeframe. We can use the feature called VMware Guest Customization specification to provide the answer file duration VM deployment from a template or during cloning existing virtual machine.
VMware Guest Customization can be created for both Windows and Linux. For Windows XP, Server 2003, and earlier operating systems, Microsoft has a different version of Sysprep for each release and service pack of Windows.
You must use the version of Sysprep specific to the operating system you are deploying. Take a look at article how to copy Sysprep files in vCenter Server appliance to customizing older version of Windows operating system.
For Microsoft Vista, Server 2008, and later operating systems, the System Preparation tools are built into the Windows operating system and do not have to be downloaded or have the version checked.
For customizing the latest Windows operating system after Windows 2008 and later, We can use VMWare Guest Customization Specification to customize the operating system. In this article, We will take a look at how to create Guest Customization Specification for Windows operating system.
For customizing the latest Windows operating system after Windows 2008 and later, We can use VMWare Guest Customization Specification to customize the operating system. In this article, We will take a look at how to create Guest Customization Specification for Windows operating system.
How to Create VMware Guest Customization Specification
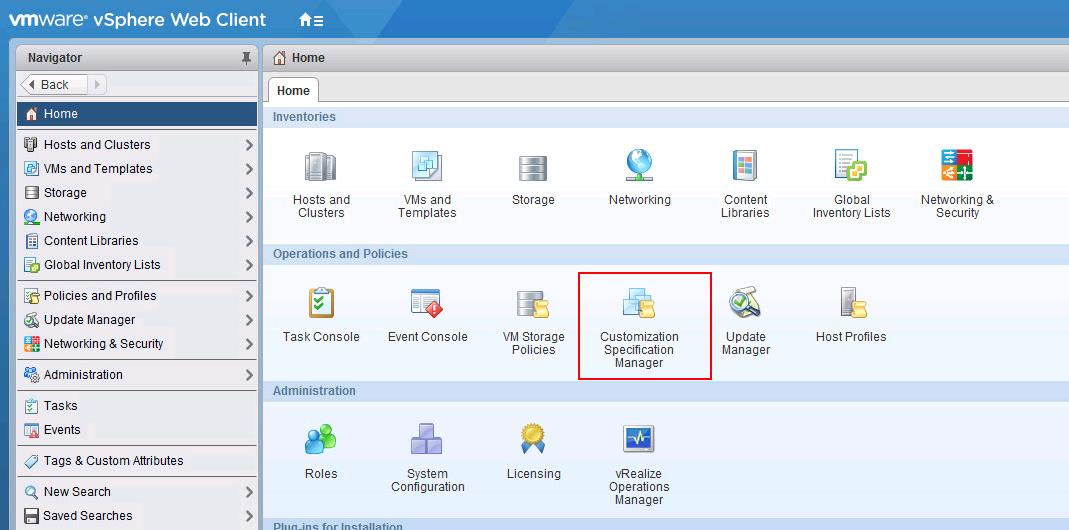
To create VMware Guest Customization Specification, Login to vCenter Server using vSphere Web Client. In the home page of vSphere Web client, Click on Customization Specification Manager.
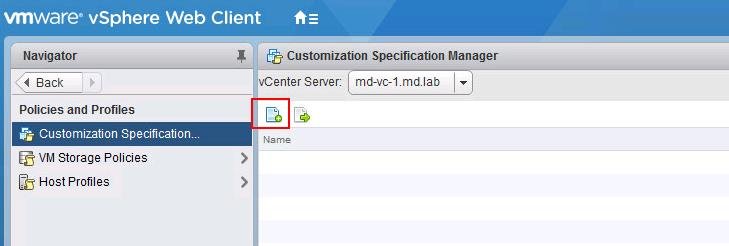
Click on “+” symbol to create VMware Guest Customization Specification
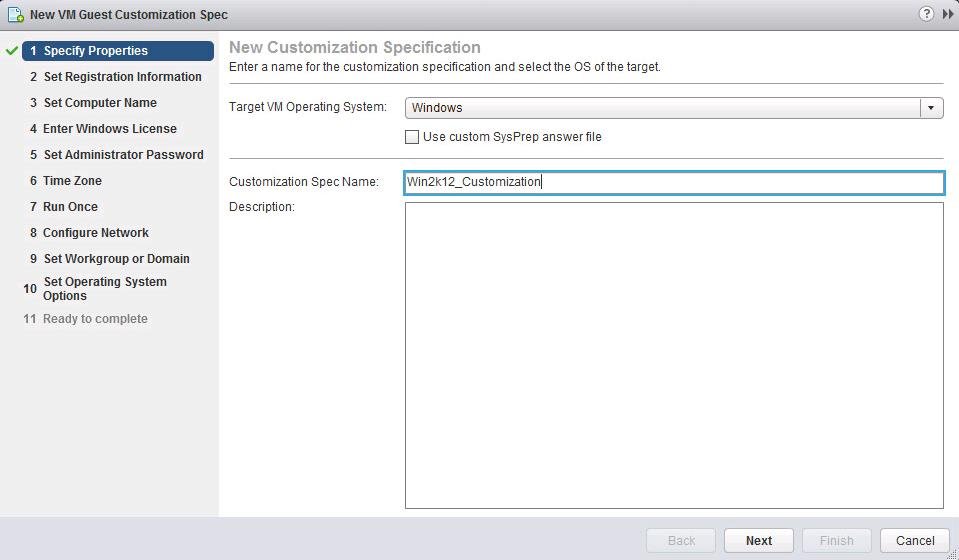
Select the operating system either Windows or Linux from the drop-down on target VM operating system and Specify the name for the Customization Specification. Enter the description for the customization specification. Click on Next.
I am creating this Customization specification to customize “Windows Server 2012”, So named it accordingly.
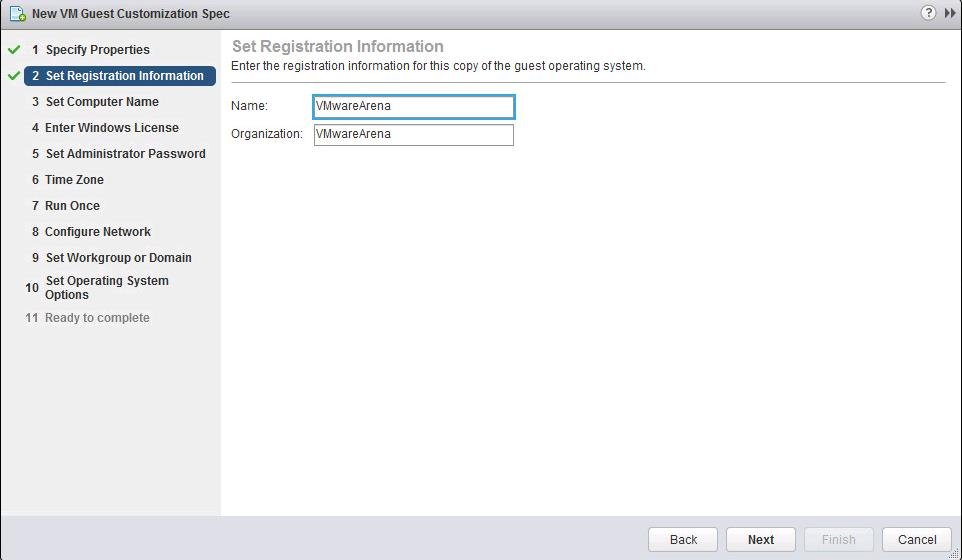
Enter the registration information for the Windows Operating system and click Next.
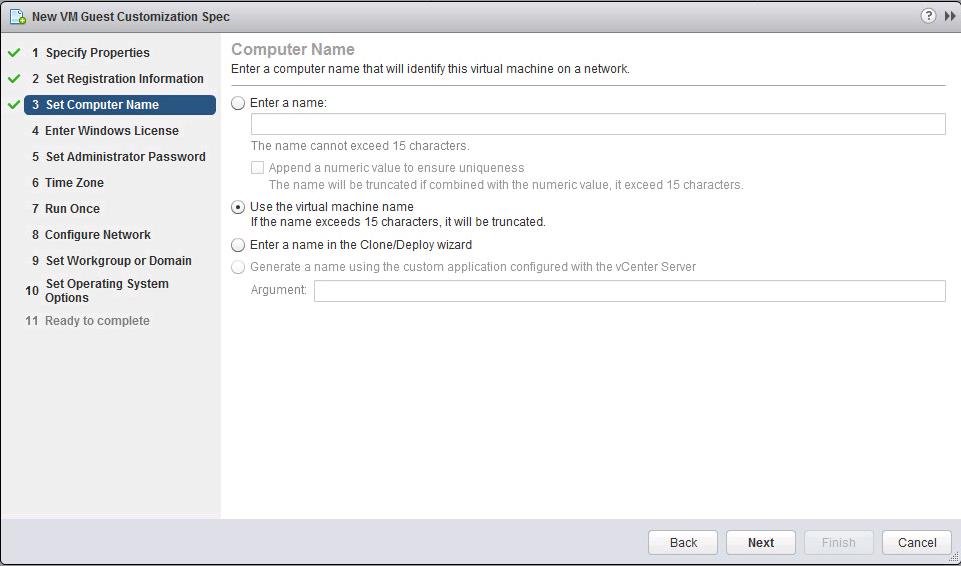
I would always recommend using computer name of guest OS as same as the virtual machine name. It simplifies the identification of the virtual machine in vCenter Server inventory. Select “Use the virtual machine name” to use the computer name as same as virtual machine name and click Next.
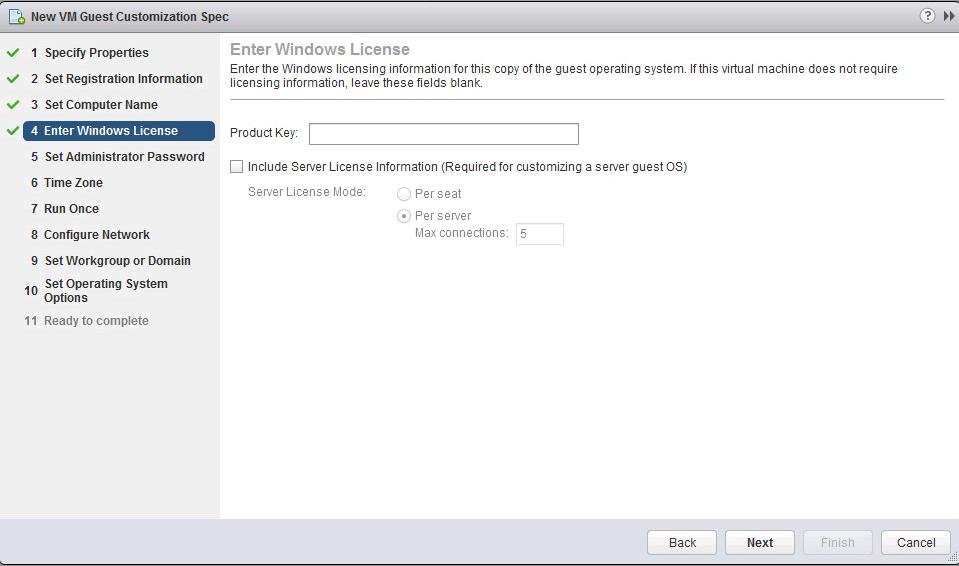
Enter the windows licensing information for this copy of the guest operating system. You can enter this information later too. Click on Next.
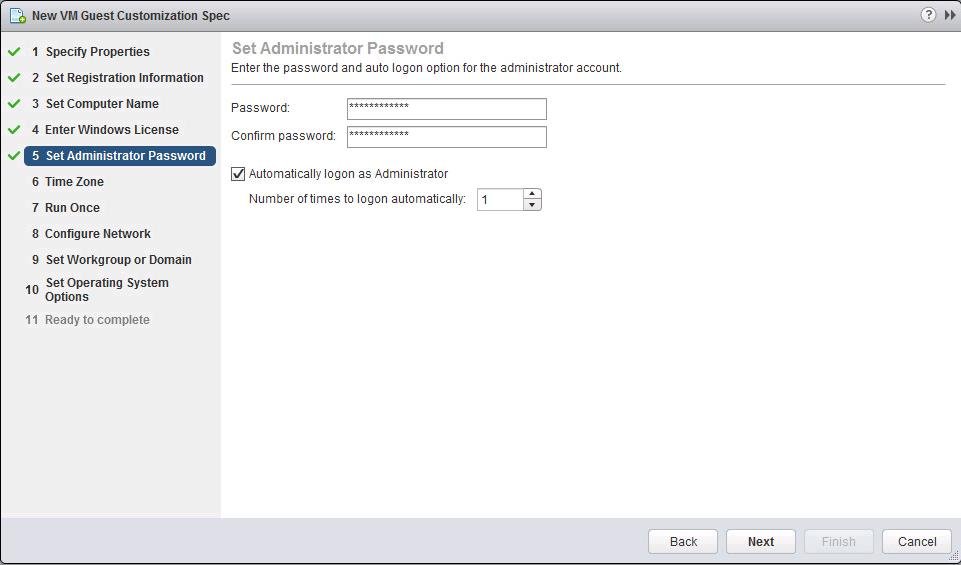
Specify the administrator password and autologin option for the administrator account of Windows operating system. Click Next.
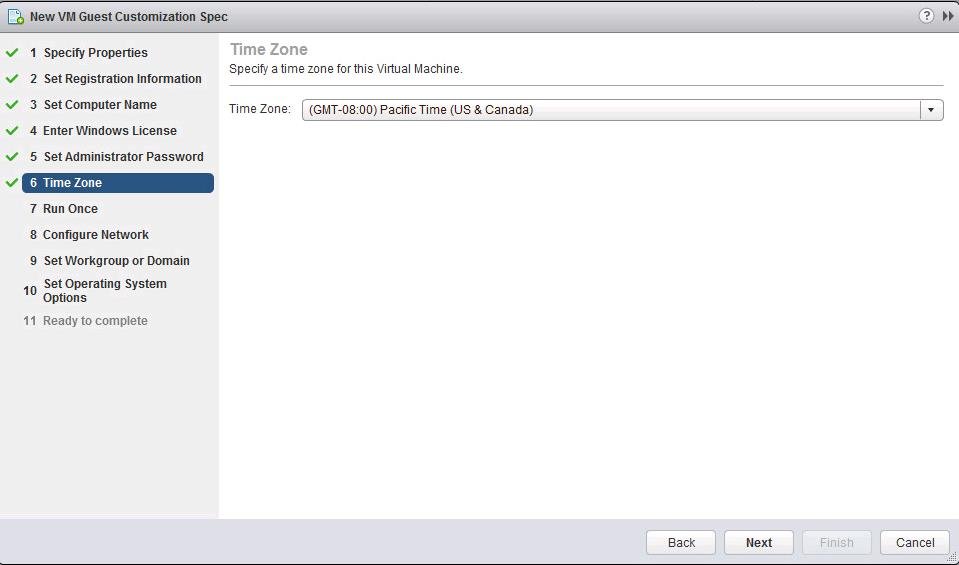
Select the Time Zone from the drop-down menu and click Next.
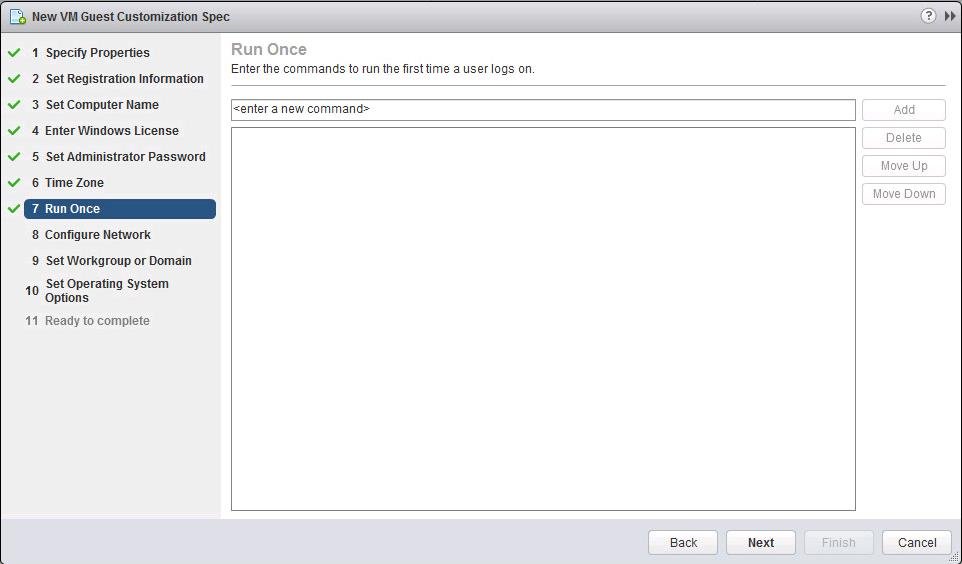
You can specify the commands to run on the first time when a user logs on. Click on Next.
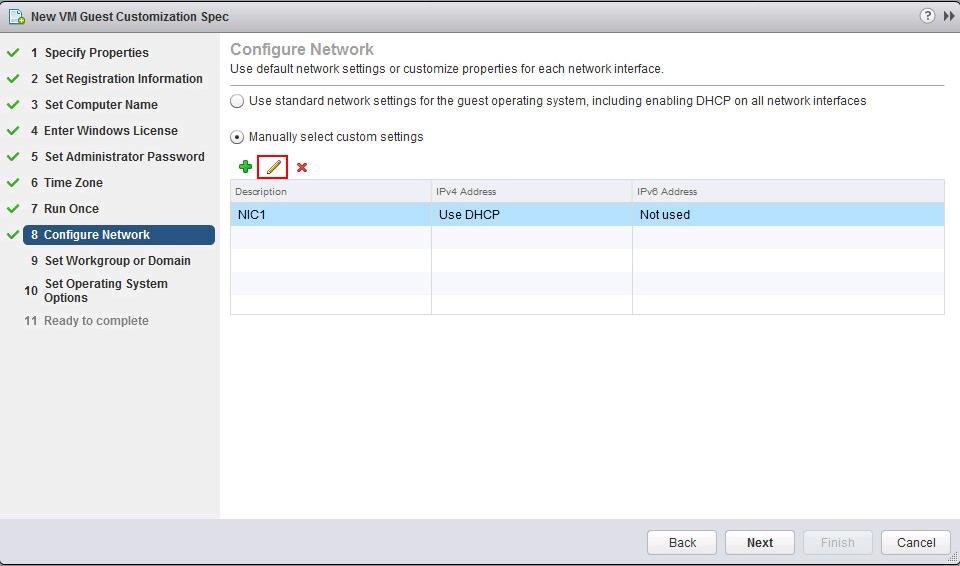
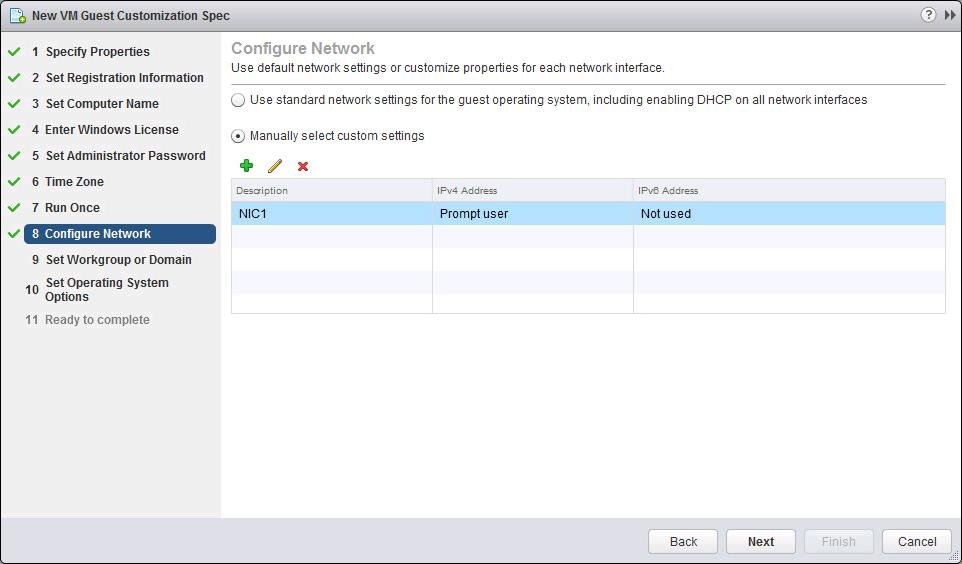
You can specify the network settings for the guest operating system. Either you can use DHCP or specify the custom network settings. To specify the custom network settings, Click on Edit “Pencil Icon”.
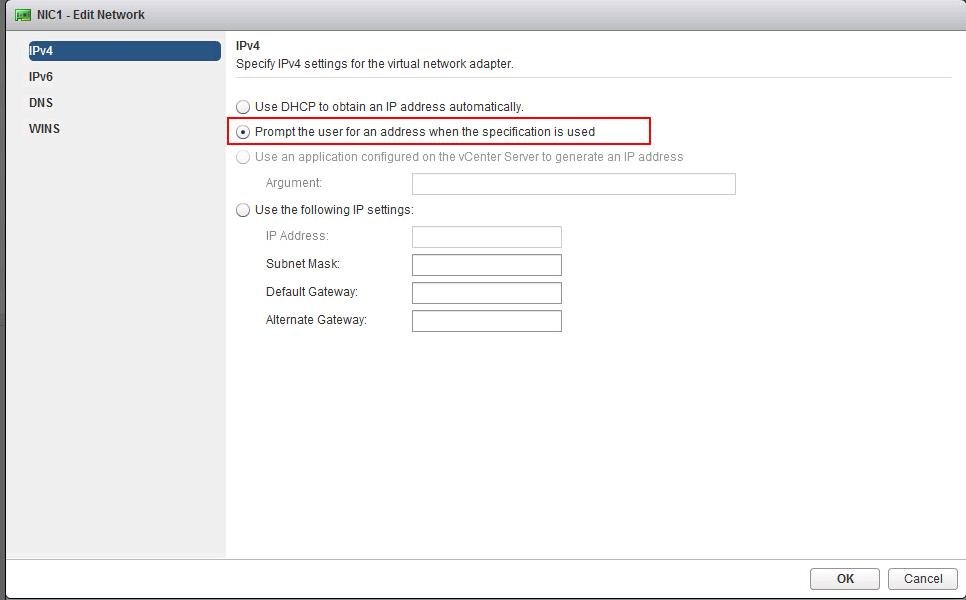
I would personally not recommended to specify the IP address in customization specification because we use this specification for multiple virtual machines. It is better to select the option “Prompt user for an address when the specification is used’. It will prompt you to specify the IP address when using this customization specification during virtual machine deployment from templates or cloning the virtual machine.
You can optionally specify the subnet mask and gateway information. We may use different network settings and VLANs based on the purpose of the virtual machine. So I am not specifying it in customization specification.
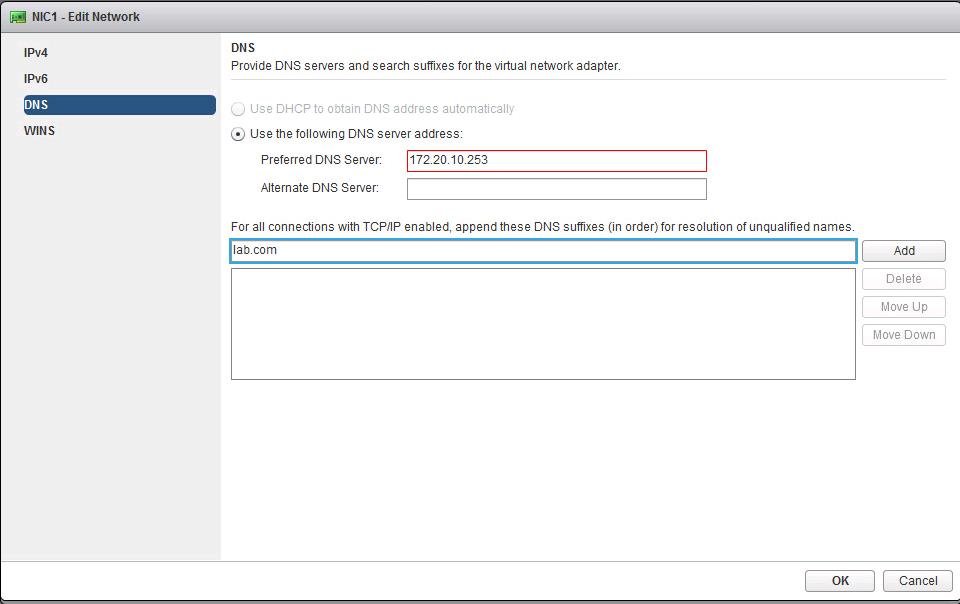
You can specify the DNS settings, Click on DNS option and specify the preferred and alternate DNS information. Along with DNS, you can also specify the DNS suffix to add to the Windows operating system. Click on OK.
Once Network settings are specified in customization specification. Click on Next.
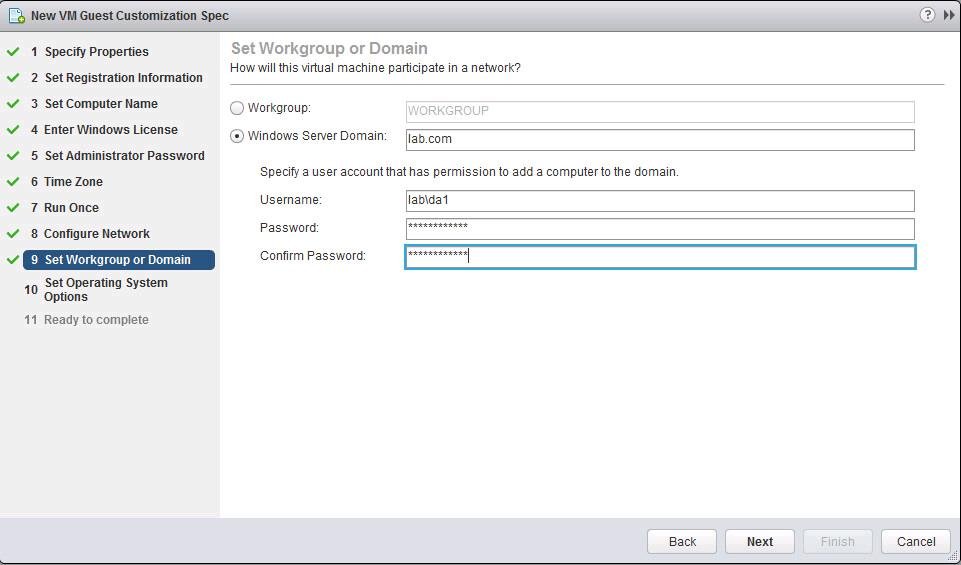
You can also specify the Workgroup or Windows server domain to join the machine. If you want the machine to join to domain, specify the user account and credentials information that has permission to add a computer to the domain. Click on Next.
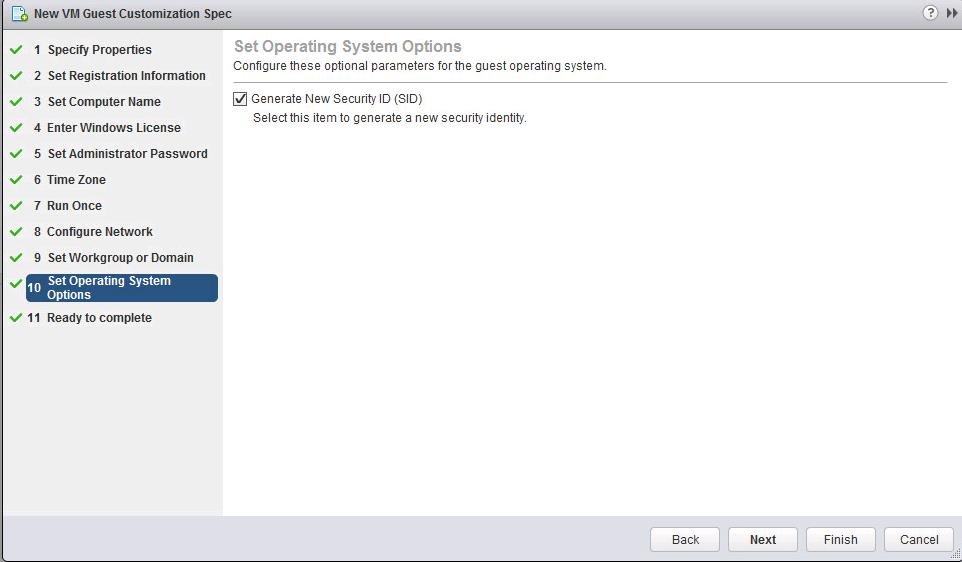
Select the checkbox “Generate New Security ID (SID)” to generate a new security identity for the windows virtual machine. This option is important to generate the new SID from the source machine. Click Next.
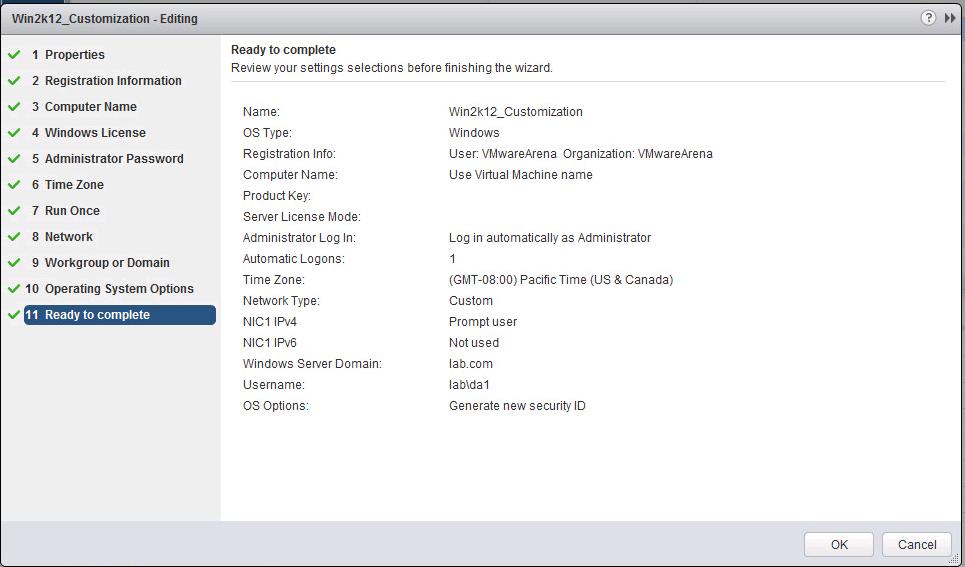
Review all the settings specified in VMware customization specification and click on Finish.
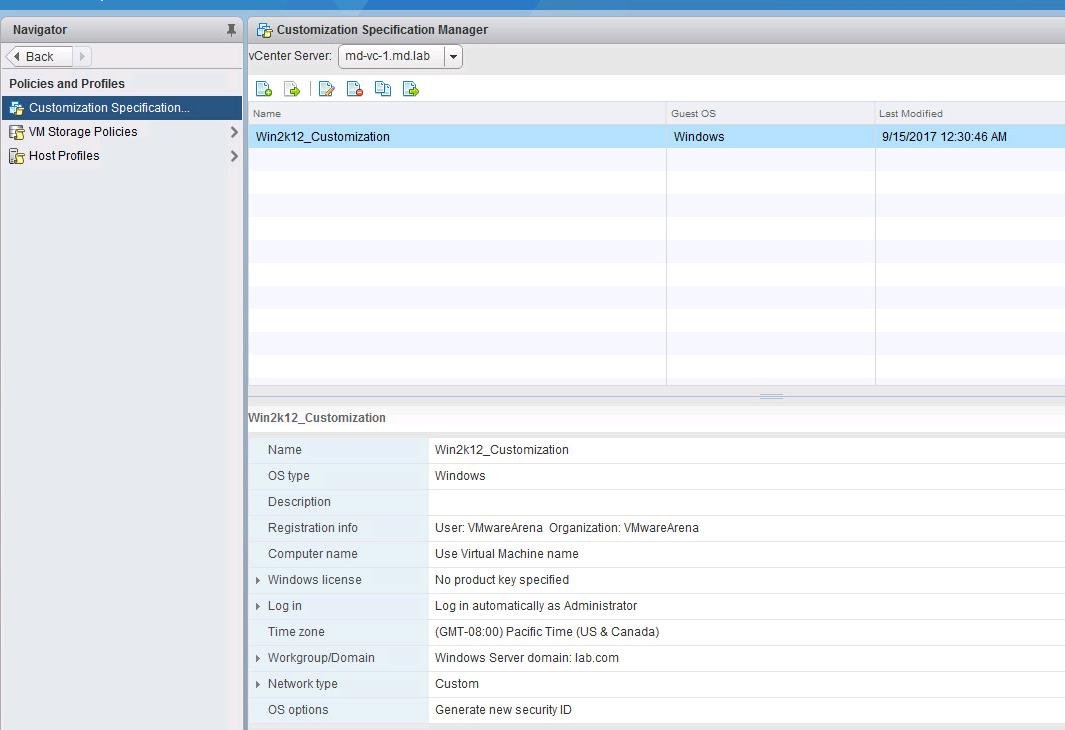
Customization specification which we created for Windows 2012 appears under the customization specification manager.
How to use Customization Specification to Customize the Windows Operating system
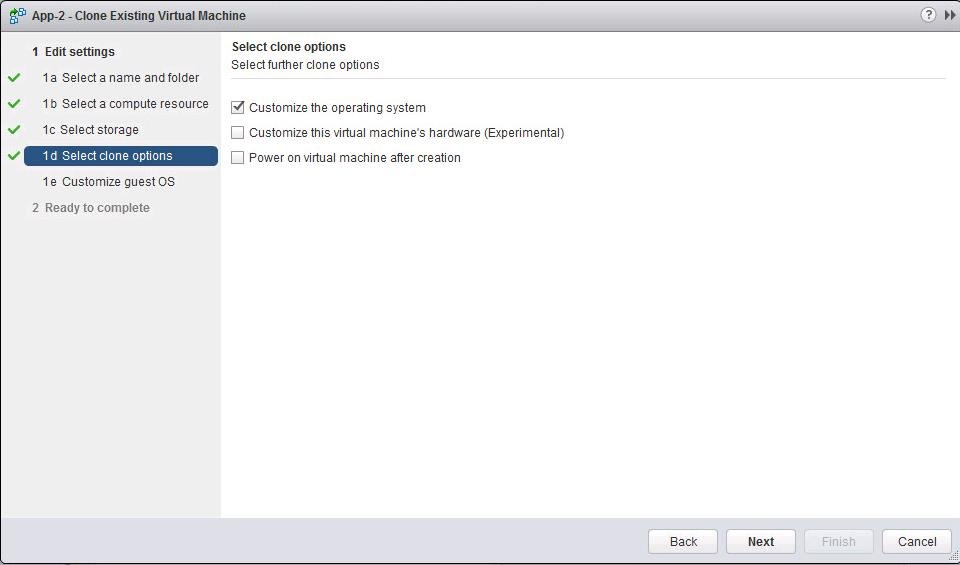
We have created guest customization specification for Windows server 2012. Let’s see how to use customization specification when we clone the virtual machine. You need to select the option “ Customize the operating system” when you are cloning a virtual machine or during deploying a virtual machine from a virtual machine template. Click on Next.
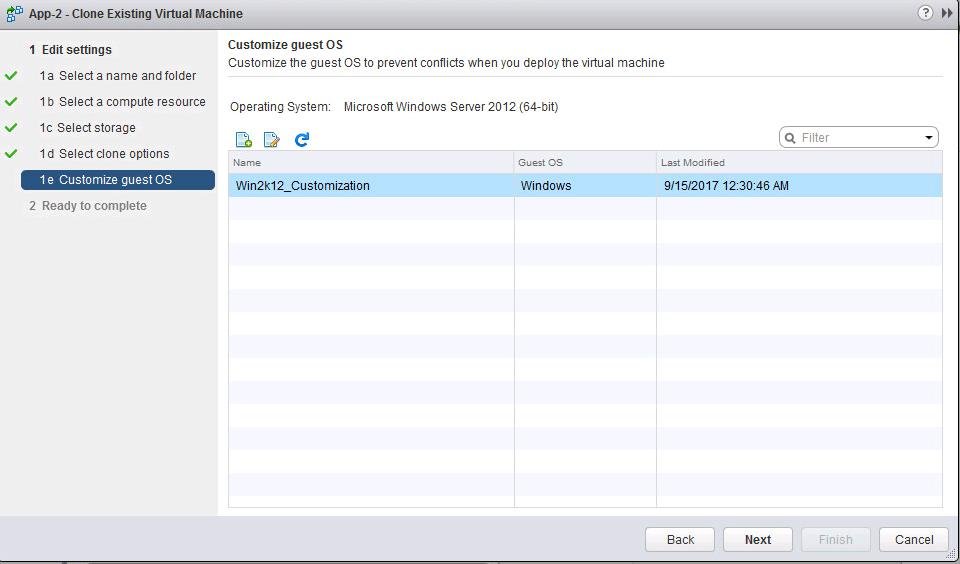
Select the Customization specification “win2k12_Customization” which we created earlier and click Next.
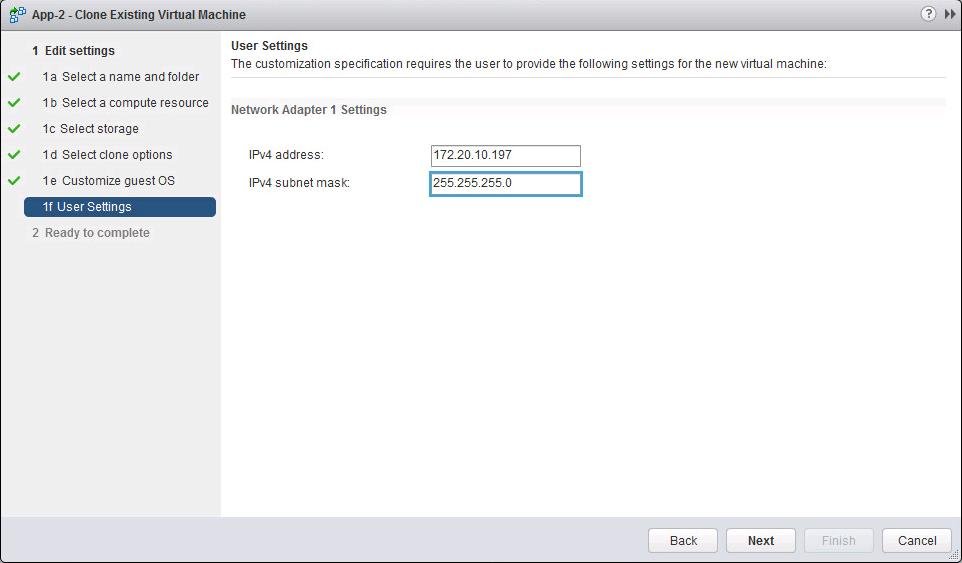
As we specified in Customization specification, It prompt’s the user for specifying the IP address for Windows Guest OS. Click Next.
Once Cloning is completed, Power on the virtual machine. You will notice virtual machine will boot into OS after power on. Later you will notice OS reboots two or more times to complete the customization as specified in VMWare Customization specification. You can open the virtual machine console, You will be able to see the progress of the customization with the message ” VMware image customization is in Progress”
That’s it we are done with creating VMware Customization Specification and also understand how to use it during virtual machine deployment to customize the operating system. I hope this is informative for you. Thanks for Reading !!!. Be social and share it with social media, if you feel worth sharing it.
You may also interested in reading the below Articles:
Top 10 Best Free Data Recovery Software to Recover Deleted Files
vSphere 6.5 Configuration Maximums – What’s New?
vSphere 6.5 – Configuring vCenter Server 6.5 HA
vSphere 6.5 – vCenter 6.5 Native HA Failover Testing


