There were a lot of questions to me about transferring files between ESXi hosts. In most of the lab scenario, not everyone uses shared storage between ESXi host to share the files between ESXi hosts. Shared datastore simplifies the way of sharing files or virtual machines between ESXi host. What if we don’t have shared datastore? How do we transfer files between ESXi host? The famous method is to use WinSCP to download the files from source ESXi host to some windows machine and again upload the same to the destination ESXi host using WinSCP. In this article, I am going to explain the procedure to Copy files between ESXi hosts using SCP command.
VMware recommends that you use SCP to copy files to or from ESX hosts. The ESXi host installation includes SCP as part of the SSH package. Not only files, You can also copy the virtual machines between ESXi hosts without the need of shared storage between the ESXi hosts. In this article, I will explain you the procedure to copy files between ESXi hosts using SCP command without the need of WinSCP.
How to Copy files between ESXi hosts using SCP command
Enable SSH and allow SSH in ESXi firewall
Only prerequisite to copy files between ESXi host using SCP command is that both source and destination ESXi host should have SSH enabled and SSH allowed in Firewall. Let’s take a look at how to enable SSH and allow SSH via firewall in the standalone ESXi host. In this example, We are going to transfer files between ESXi 6.5 hosts using SCP command.
Log in to the ESXi Host Client using the below URL https:<ESXi host name or IP>/ui and log in with “root” credentials.
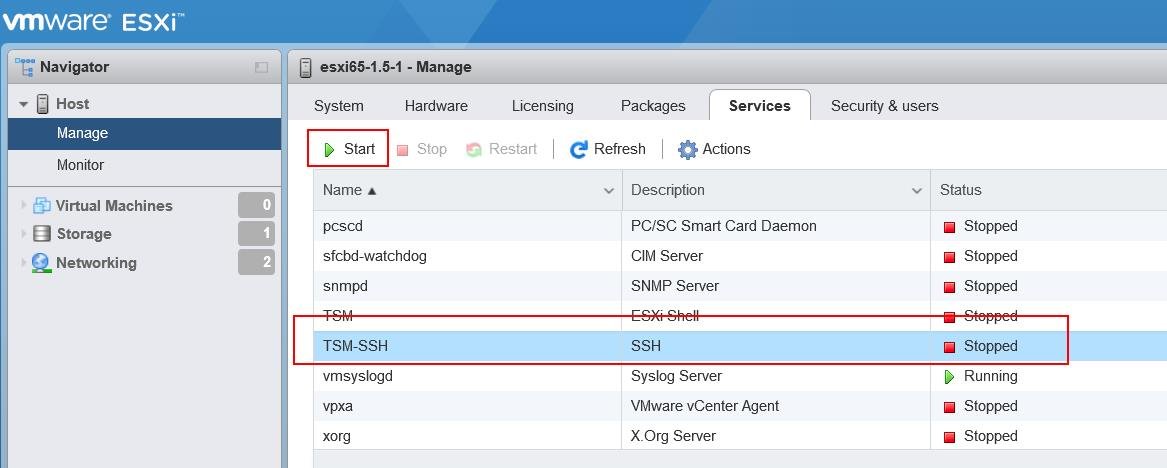
Click on Manage under Host -> Services -> Select the SSH service “TSM-SSH” –> Click on Start to start the SSH service.
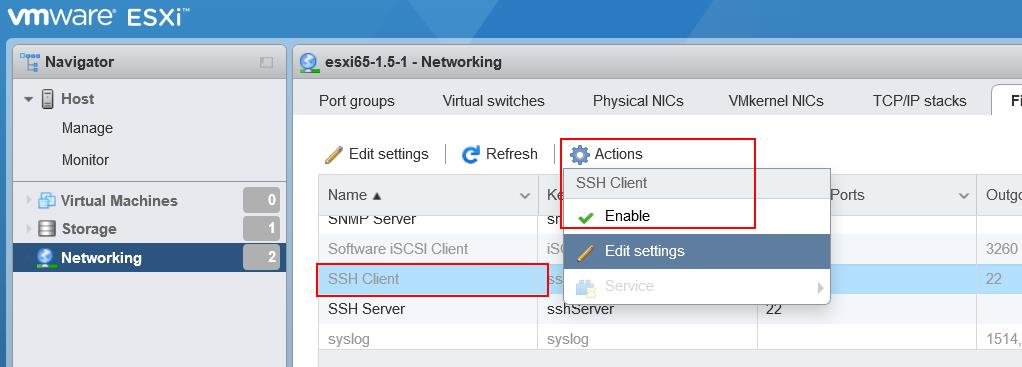
Once SSH service is started, We need to allow the SSH Client in ESXi firewall. To allow SSH client in ESXi Firewall, Click on Networking -> Firewall -> Select SSH Client -> Click on “Enable” under Actions Menu.
Testing SSH Port Connectivity between ESXi hosts
Once SSH service is started and allowed via ESXi firewall on both source and destination ESXi, You can test the connectivity on Port 22 between the ESXi hosts using the below command
nc -Z destination_hostname port number

Example:

nc -Z esxi65-2 22
Connection to destination ESXi host via port 22 is succeeded. We are good to copy files between ESXi host using SCP command.
Copy Files between ESXi hosts using SCP command
You can use the SCP command in below format to copy files between ESXi host.
SCP /source_directory root@destinatiion_hostname://destination_dircetory/
I have transferred windows 2008 OS ISO image file called “win_2k8.iso” store in the directory called “ISO” in local datastore of the source ESXi host “esxi65-1” to the “ISO” directory in Local datatsore of destination ESXi host “esxi65-2” using the below command
SCP /vmfs/volumes/datastore1/ISO/win_2k8.iso root@esxi65-2:/vmfs/volumes/datastore1/ISO
It will prompt you to enter the root password of the destination ESXi host to transfer files using SCP. Enter the password and Hit enter. The copy will start and It will display the progress of the copy in % and also the Speed of the transfer and ETA to complete the transfer.
Copy of files between the ESXi host is completed and It shows Size of the file, Average speed of the transfer and time taken to complete the copy.
I have connected to destination ESXi host “esxi65-2” to validate the copied file. It is located under ISO directory of local datastore.
That’s it. We are done and I am sure you are clear with the procedure to copy files between ESXi host using SCP command. Thanks for Reading !!!. Be social and share it with social media, if you feel worth sharing it.
You may also interested in reading the below Articles:
Top 10 Best Free Data Recovery Software to Recover Deleted Files
vSphere 6.5 Configuration Maximums – What’s New?
vSphere 6.5 – Configuring vCenter Server 6.5 HA
vSphere 6.5 – vCenter 6.5 Native HA Failover Testing


