VMware Horizon has various components and View Composer is one of the optional components of VMware Horizon 6. View Composer needs to be installed on the Windows Server on which vCenter Server is installed or on a separate Windows Server computer. View Composer requires an SQL database to store data. You need to create ODBC Connection between the SQL server and Server ,where View Composer is getting installed. The View Composer database can be reside on the server as View Composer server host or in a remote database server. For Either of the DB server, you need to create ODBC connection. You might be having exitsing Database server for your vCenter Server. View Composer supports a subset of the database servers that vCenter Server supports. The View Composer database stores all the information about linked clone virtual desktops deployed by View Composer. This article helps you to understand the Step by Step procedure to create ODBC Connection (DSN) for the View Composer installation.
Create ODBC Connection for VMware Horizon View Composer
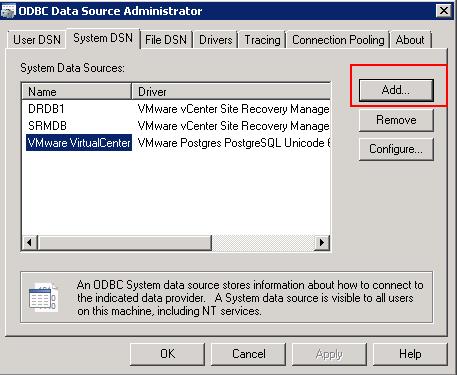
Login to the Windows server where you are going to install View Composer and Open ODBC Data Source Administrator. Select System DSN tab and Click on Add.
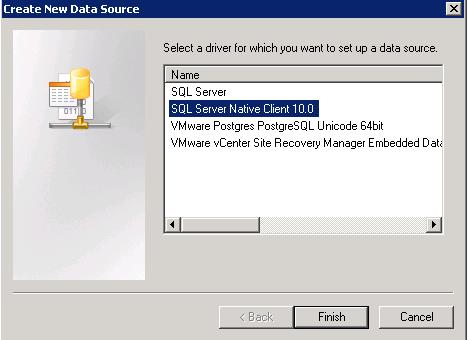
Create New Data Source wizard will open. Click on SQL Server Native Client 10.0 or 11.0 and Click on Finish.
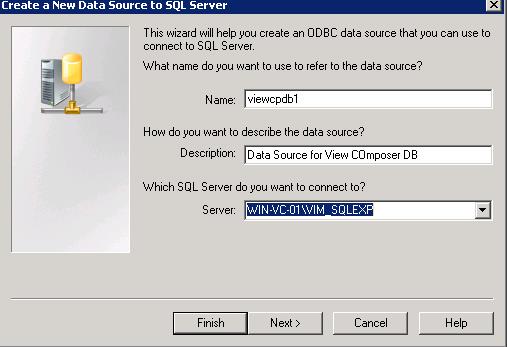
Type the name for the ODBC connection, description for the ODBC connection and SQL server IP address or Hostname. Click on Next.
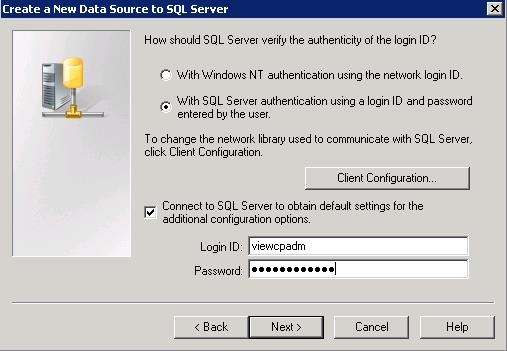
There are two types of authentication. Windows NT authentication and SQL server authentication.
Windows NT authentication : Select this option if you are using a local instance of SQL Server. This option is also known as trusted authentication. Windows NT authentication is supported only if SQL Server is running on the local computer.
SQL Server authentication: Select this option if you are using a remote instance of SQL Server. Windows NT authentication is not supported on remote SQL Server.
Since i am using the remote instance of MS SQL server, I have selected the option of SQL server authentication. Enter the Login ID and password for the SQL server authentication and click on Next.
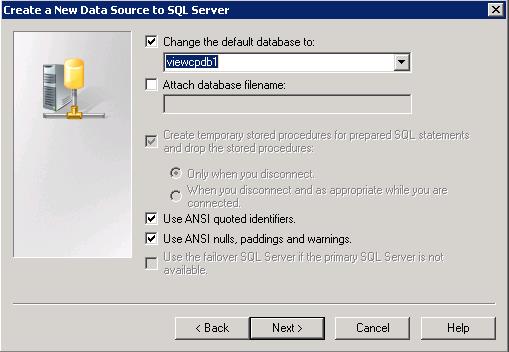
Select the Check “Change the default database to ” and change the default database to View Composer database instance ,which your SQL administrator created for View composer installation. Click on Next.
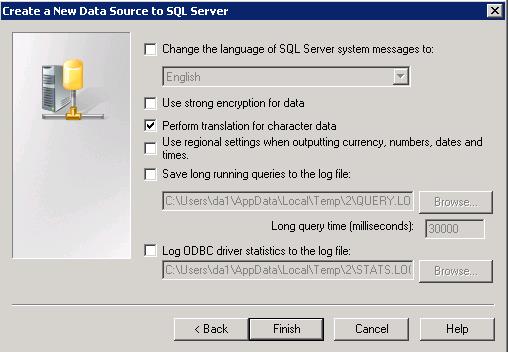
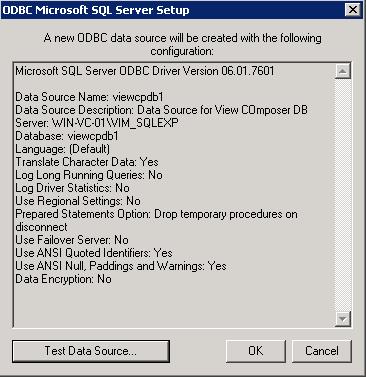
Review the ODBC connection settings and click on Finish.
Click on Test Data Source to test the Database connection.
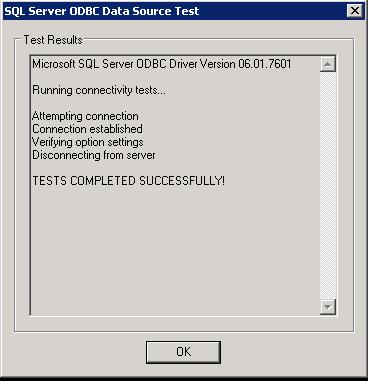
You can see the message “Tests Completed Successfully”. Click on Ok.
Horizon View 6 Related Articles:
VMware VDI – Horizon View Overview & Components
VMware Horizon 6 – Install View Connection Server
VMware Horizon 6.x – View Composer Installation
Create ODBC Connection for VMware Horizon View Composer Installation
Horizon view licensing – Overview and Configuration
Configuring VMware Horizon View Administrartor – Virtual Desktop Infrastructure
Configuring VMware Horizon View Event Database
VMware View Agent Download and Install on Win7 Master Image
Understanding VMware Virtual Desktop Pools – Horizon View 6
Creating Manual Desktop Pool -VMware Horizon View 6.x
Creating Linked Clone Desktop Pools in VMware Horizon View 6.X
Install Remote Desktop Session Host to Setup RDS Host Farm in Horizon View
VMware View Agent Installation on Remote Desktop Session Host
Creating Remote Desktop Session Host Farm in VMware Horizon View
Creating RDS Hosted application pools in VMware Horizon View


